Thursday, May 31, 2012

French Fridays with Dorie: Lentil, Lemon, and Tuna Salad


LOVELY LENTIL, LEMON, AND TUNA SALAD  LETTUCE WRAPS
 This week's salad has strong overtones of a recent Dorie cooking project also with lentils and fish: salmon.

This salad meal was healthy, but not exciting.   My grandkiddies came to swim and enjoyed a cookout which included a side of today's salad.  The opportunity was taken to introduce them, once again, to lentils with the bribe of chocolate truffle cookies if they ate their portions.

For patio dining, I turned this lentil-tuna salad into lettuce wraps which could be eaten by hand.  First we  portioned out pretty rounded amounts of lentils and then of tuna salad and added chopped veges.  Next, we tried layering these foods and found the easier method to look just as lovely.

ALL INGREDIENTS LAYERED ON MAKES A HEALTHY SIDE
To make the lentils a little more flavorful I added chopped onion and carrots.  The tuna was made into a tuna salad with mayo, sweet pickles, onion, lemon, and seasonings.  I'm sure the whole idea conforms to the given recipe well enough.

The chocolate truffle cookies were exciting, however, and did the trick.  Everyone cleaned their lentils and earned their cookies.
 
DEEP DARK CHOCOLATE TRUFFLE COOKIES

KRIS'  CHEWY CHOCOLATE TRUFFLE COOKIES:
Yield: 40 using my smallest ice cream type scoop...about 1 Tablespoon of dough

First, line baking sheets with parchment paper or silicone mats.

Beat together until thick ribbon stage:
2 large eggs
2 1/3 cups sugar
1 Tablespoon honey

Melt together in microwave and stir until smooth:
8 ounces bittersweet chocolate
3 Tablespoons butter

Combine:
2.75 oz almond flour
1/2 teaspoon salt
1 Tablespoon cocoa

Add the dry ingredients to the chocolate mixture and combine.

Stir 1/3 of the egg mixture into the chocolate mixture to lighten it.  Then gently fold the rest of the egg mixture into the chocolate until well combined, making sure to keep the mixture aerated.

Chill until firm, about 1 hour....REALLY FIRM!

Scoop out the dough and roll each dough ball in sugar, place on baking sheet and place in freezer.  When dough balls are frozen solid, bake at 350 degrees for 10 minutes.

Keep these cookies in the fridge especially in AZ...they love to be eaten cold.

If any cookies are left over...very doubtful...they keep well in an air tight container in the fridge for 2 weeks.   Nice to have on hand for rewards including for myself.

ENJOY!


Thursday, May 24, 2012

LYONNAISE GARLIC AND HERB CHEESE USED AS A VEGE DIP
Hubby makes a great vege dip that he shares with his friends every holiday season.  It began as an alternative to all the sweet treats going around the neighborhood, and it is an item that he can make really well without my input.  He uses a base of cream cheese and sour cream and adds minced onion, peppers, garlic, carrots, scallions, and other flavorful vegetables.  To that mixture he adds fresh herbs and seasonings.  This concoction ripens in the fridge for a day allowing all the flavors to come together.  Each year, several neighborhood young men who seem to know when Hubby is putting together his dip,  knock on our door requesting  their own LARGE container of this dip...not to be shared with their families.  I incorporated a couple of hubby’s seasoning ideas to make today’s cheese dip even more flavorful.

The Lyonaise Garlic  and Herb Cheese recipe that I used as a vege dip similar to Hubby’s was perfect for a hot summer day.   My neighbor, Bob, surprised me this morning with an armful of produce from his garden.  Sadly, it is his last picking of the season as the hot Summer temperatures have fried his plants.  He will grow his garden again beginning in the Fall...we are a little backwards from the rest of this country...most of you have a freeze, we have the roasting heat.

Early this morning I set out 2 cups of ricotta cheese in a mesh basket to drain.  Before dipping it out I poured off the liquid that had collected at the top of the container.  At that point, the cheese looked quite dry so I was surprised by all the liquid that had dripped out by the time I was ready to use it.    This neutral flavored ricotta cheese, suggested by Dorie as an alternative to her usual French cheese,  was the foundation for my dip. 

Instead of a shallot, I minced ½ a red onion, which I thought would impart a pretty color as well as savor.  Then I minced a clove of garlic,  splashed in the EVO, and added salt and pepper to taste.

From my garden I added chives, lemon tarragon, and the end of my parsley...it’s now too hot for all but the most heat-hardy items.

Then I tasted the dip.  It was blah...nothing special, even with all the flavorful herbs and minced vegetables.  After resting for an hour, the herbs, garlic, and onion did not impart much exciting flavor.


THIS HERBED CHEESE EASILY COMES TOGETHER
That’s when I used Hubby’s additions of a Tablespoon or two of soy sauce, a dash of Worcestershire sauce, and a healthy pinch of cayenne pepper.  These additions did enhance the flavor without detracting from what I think this herb cheese is meant to be.  I later wished I had taken Hubby’s advice and also added minced red pepper which brings a sweetness and more flavor to this type of dish.  (Some of these additions added  more salt.  I might have easily added more “salt to taste” but I had previously added a good portion of salt and wanted something more.)

This herbed cheese can be thinned and used as a salad dressing, or it also goes well with breads or crackers.  I liked the idea of stuffing small tomatoes with this cheese and adding a drizzle of pesto sauce.  This idea sounds interesting to me and I plan to try it next time.  (I have 1/2 a container of Ricotta remaining to be used.)


DELICIOUS WITH FRESH VEGETABLES
This cheese is easy to put together and I can think of several uses, but it needs to be put with foods that are flavorful on their own and just need a condiment added.  For example: I think this cheese would be good spread onto large tortillas instead of commonly used cream cheese spread to begin a wrap.  With added thin sliced meats, cheeses, tomatoes, etc., this would come together in a good combination.  It would also be delicious used as an alternative to humus. Or instead of mayo on a BLT.  Or maybe with a stronger grated cheese added to the mix.  Or bacon.....

I look forward to seeing how you all used this cheese and to see if you made any good flavor additions.

Hope you all have a lovely Memorial weekend that includes good food and family along with honoring those who we appreciate and who we do not forget.

Saturday, May 19, 2012

Baked Sunday Mornings: Peanut Butter and Banana Cream Pie


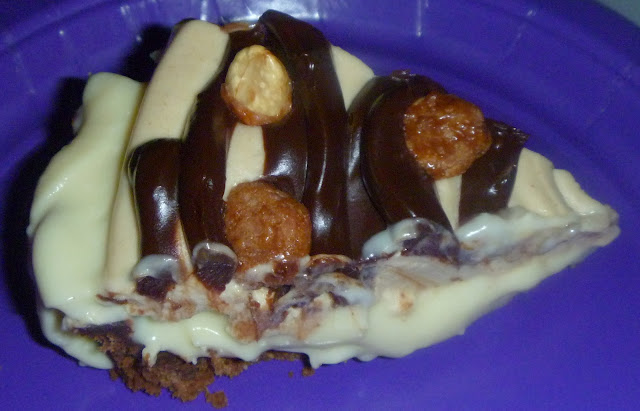
DECADENT PEANUT BUTTER AND BANANA CREAM PIE FOR MY "OWL'S' CHOCOLATE PARTY

Today’s Peanut Butter and Banana Cream Pie is actually part II if my “chocolate” tart/pie baking adventure for my Frolicking Night Owl daughter’s chocolate party.  Part I was the FFwD Double Chocolate and Banana Tart posted 2 days ago.  With minor adjustments, both are fabulous “keeper” recipes.

To comply with being a part of a chocolate party, this pie was given a chocolate crust and melted bittersweet chocolate was swirled around the top.  Viola...this is now a Chocolate Peanut Butter and Banana Cream Pie.
BANANA'S IN ANTIOXIDANT ORANGE JUICE--TASTES BETTER TO ME  WITH THE PIE FLAVORS THAN DORIE'S TART THAT USES LEMON JUICE ON THE BANANA SLICES
I MADE THIS PIE IN TART STYLE--WORKED WELL
The only other change was the chocolate covered peanuts that I could not add to the top...they melted before I got them home...it was 106^.  Then I decided on chopped peanut butter cups as I had a fresh bag begging to be used and I thought they would complement this pie...but unfortunately they too were melted...totally.  So, in honor of the AZ heat, my garnish then became toffee covered peanuts, which do not melt. 

I was surprised that this custardy, peanut buttery, banana pie held up at an outdoor party...I was expecting it to droop and melt just like those peanut butter cups...but, surprise, it held up even in our heat.  Wonderful!
Comparing the two pies, this was my personal favorite.  I’m a sucker for good custard and when in company with all these great flavors and ingredients, this pie is a real winner.  Dorie’s ganache and banana tart, which also has many layers, is elegant and decadent, but there are no surprises.  It tastes just as I expected it should.  But this pie with the many layers and flavors was exceptional and surprising.

And the most important reason for me persoanlly to love this pie, is that even though I am not super excited by chocolate and peanut butter together...I must have eaten too many peanut butter cups as a kid...I did love the chocolate and peanut butter paired in this pie.  This will be a good pie to make in the future for my chocolate-peanut butter lovers, and I'm excited that I can love it too.  (I know, this pie does not really have chocolate as written in the recipe, but as of this week, it does for me.)

OUTSIDE IN THE DARK--BUT YOU CAN STILL SEE THE WONDERFUL INTERIOR OF THIS PIE
I KNOW, THIS IS A TERRIBLE PHOTO, HOWEVER THIS IS MY SLICE AT THE DARK OUTDOOR PARTY AND IT IS FABULOUS!
This Baked pie brought several great flavor layers together and it truly surprised me with all the wonderful  layers that worked so well together.  It was worth all the steps and all the dirty dishes.  I will do it all again soon and this time I will anticipate eating more of this pie myself...no sharing with a chocolate party!

I'm excited to see all your pies.  I'm in the mood to bake this one again tomorrow!

Thursday, May 17, 2012

French Friday with Dorie: Double Chocolate Banana Tart


TRIPLE CHOCOLATE AND BANANA TART
My Frolicking Night Owl daughter had a Chocolate Party Tuesday evening, and it was better than fabulous.  Zillions of her friends and family came and everyone baked their favorite chocolate desserts or brought their favorite chocolate candies for all of us to try.  The Owl made her two favorite chocolate contributions and also provided a chocolate fountain with a great dipping selection. All the desserts were amazing and after two hours of eating chocolate goodies non-stop I had to go home, but I was well energized for a few late night hours of work.  As I was leaving, a whole new crowd of chocolate eaters were arriving.  I should have stayed and tried all their desserts too.  I decided I should have a chocolate party–very addicting!  With Evite these parties are a breeze to plan.   (I heard that some party attenders stayed until midnight...I think I missed out.)


THE CRUST HAS BEEN BAKED


AND SEALED WITH GANACHE

Trading work hours for baking and chocolate eating hours was a great idea.  I spent the afternoon baking two different banana chocolate tarts/pies...one for FFwD, and one for Baked Sunday Mornings.  I was happy to do my office work at night while on a sugar and chocolate high.  With all my energy, I’m sure my work quality was A+.


And, it was also fun to compare these two desserts.  I cheated on the Baked Explorations’ Peanut Butter and Banana Cream Pie, also giving it a chocolate crust and I added a drizzle of chocolate over the top...it had to be chocolate, of course.  Both were really great crowd pleasing desserts.  For this post I will feature Dorie’s Double Chocolate and Banana Tart and on Sunday morning I’ll write about the “Baked” pie.

Dorie’s chocolate crust is perfect.  It mixed easily and after being refrigerated it rolled out nicely between two pieces of plastic wrap...no mess.  It did crack just a little while baking and I wanted to seal those cracks before adding the caramely bananas to the tart bottom...so I sealed the tart crust with ganache and put it in the freezer for 10 minutes.  It sealed perfectly...And more chocolate just makes it more better.

LEMONED BANANA SLICES IN THE CARAMEL LINE THE TART BOTTOM
Next time for this tart,  I will make a better caramel for the bottom banana layer...like a good, sticky caramel sauce.  I’ve decided I’m not a big fan of the melted sugar caramel which, to me, has a little bitterness in the finished flavor.  And with a little lemon flavor from the lemoned bananas, it was not my favorite.  I know, a little lemon is often added to caramel sauce, however, not to my caramel sauce.   Hubby likes the melted sugar and pours  it over his frozen yogurt.  I guess I envisioned a different product.


BECAUSE I THOUGHT THE CARAMEL WAS JUST A BIT BITTER--I BAMMED IT WITH CONFECTIONERS' SUGAR BEFORE ADDING THE GANACHE
The ganache filling was incredible.  Is there anything better?  The bananas were an enjoyed addition, but I found myself  dreaming about raspberries or other chocolate friendly additions...like my new find at Costco which are their dark chocolate-almond-cherry clusters–Oh my!  I was thinking about chopping them up and ditching the bananas.  Next time.  And I’m thinking about these clusters with the raspberries.

I COULD EAT A GANACHE TART PLAIN!  ALL BY MYSELF!
After this dessert was assembled, I drizzled melted bittersweet chocolate over the top...had to make it even more chocolaty for the party.  It was YUM!

AT FROLICKING NIGHT OWL'S HOUSE THIS TART SLIPPED RIGHT OUT OF THE BAKING PAN & ONTO THE PLATTER--PERFECTLY
I wondered how this chocolaty tart would hold up at an outdoor AZ summer party.  When my house is 82^ my chocolate begins to melt, and we keep our house at about 82-84^ in the summer.  That probably sounds too warm to many of you, however, this week we reached 106^ and that was my yard work day, out in the blue skies and sunshine, this week’s work took 6 hours.  So coming into a cool 82^ feels really good.  I actually get cold below 80^.  Most of us living in the Phoenix Valley have adjusted to the heat...unless we work in something like a super-air conditioned office.  I know it will sound gross to you, but the room with my computer where I type up my blogs is a comfy 100^ with no A/C...my choice.  My kids think I’m weird, but sitting here under the ceiling fan, with an icy cold drink, and after a dip in the pool, is like heaven to me.

SORRY ABOUT THE BAD PHOTO, BUT THIS IS OUTSIDE IN THE DARK...CAN YOU SEE  ALL THE WONDERFUL LAYERS IN THIS FABULOUS TART
Anyway, back to the tart.  It did hold up well.  Surprise.  And so did the “Baked” pie with its custard layer and creamy peanut butter layer...and all my sliced bananas in these pies stayed fresh looking...no brown bananas in my desserts.  Whew!

I KNOW, THIS IS A REALLY BAD PHOTO, BUT THIS IS MY SLICE AND IT IS A SLICE OF DELICIOUSNESS
I will enjoy seeing all your tarts.  I’m guessing many of them made it to Mothers’ Day tables which I think is a wonderful idea.


Thursday, May 10, 2012

Traditional Yellow Birthday Cake with Chocolate Frosting

NO. 1 SON'S BIRTHDAY CAKE
No. 1 Son wanted us to take him out for a steak dinner on his birthday...he has a favorite family friendly spot.  It was a very busy day so I got up early and made him a cake, well, 2 cakes.  That way the family could share one with him and he could take one home.

I phoned the restaurant and asked if it would be OK for me to bring my cake for our birthday dessert.  YES.  That was a relief, as some have a policy of NO.

No.1 Son is not the chocoholic that I am, preferring instead, fruity desserts, and also pastries that taste like frosted sugar cookies.

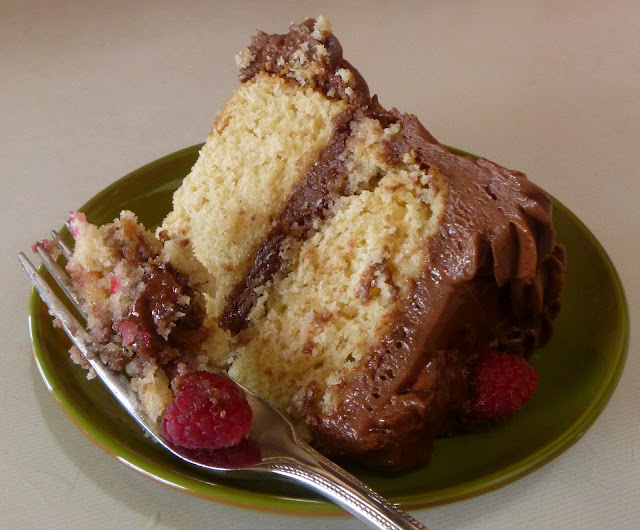
AFTER 2 100^ DAYS AND TRAVELING THIS CAKE REMAINS MOIST AND DELICIOUS

I decided to use my traditional birthday cake recipe...vanilla cake with chocolate frosting and I added berries to the tops.

This recipe makes a one layer 9" cake, but by 3 X the recipe, I got 4 layers in 8" pans, making enough for both my cakes.

USED ALL THE CHOCOLATES IN THE KITCHEN FOR THIS FROSTING
For the frosting, I did a “use up the chocolate in the kitchen” creation that worked well.  I had cocoa powder, dipping chocolate, chocolate bars and used them all.  I added a pound of butter per cake frosting and 1/4 cup per cake of corn syrup.  Vanilla was added along with  confectioners’ sugar and everything was beaten together making a spreadable/pipeable frosting...and it all kept nicely through the hot day, traveled well to the restaurant and back home (a few leftover slices), and the slice in the photo is from the next day....and it is 100^ today at our house.  So...it worked!  (Always worry about a butter frosting melting in our heat!)


THIS ONE WENT HOME WITH THE BIRTHDAY BOY

Ingredients for my Traditional Vanilla Birthday Cake:                           

In a mixer bowl with a paddle attachment cream together:
1 cup sugar
½ cup unsalted butter, room temperature

Add:
2 large eggs, room temperature
1 Tablespoon vanilla extract

Beat until well combined and creamy.

In a medium bowl whisk together:
3/4 teaspoon salt
2 teaspoons baking soda
1 2/3 cups AP flour 


Mix:
Add to mixer bowl ½ the flour mixture; beat to combine.

Then add 1 cup full-fat sour cream, beat to combine...be careful not to overmix.

Now, remove bowl from mixer and add last ½ of flour mixture, folding all the ingredients together just until combined.

Bake in an oven preheated to 350^.  To prepare the 8" round cake pan, spray a vegetable oil on bottom and sides and sprinkle sugar over the oil, dumping out any excess.

Add the batter to the pan.  It is thick and will need to be smoothed to the edges with a rubber spatula.

Bake 30 minutes or until a toothpick inserted into the center comes out clean and top is golden brown.

Remove cake to rack for cooling.  After 10 minutes remove cake from pan and cool completely before frosting.  This cake adapts well to many flavorings and toppings.  It is also good with a ganache topping...chocolate always tops this traditional birthday cake well.  This cake is sturdy enough to fill.  I added homemade strawberry jam and a layer of my chocolate frosting between the layers.  Pastry creams also work well between layers and with the ganache topping it becomes a delicious Boston Cream Pie.

If you want to split this layer, such as for a Boston cream pie, first freeze your cake before cutting in half.  This cake is moist, but can be crumbly in the cutting process.

Note: Vanilla yogurt or thick buttermilk can replace the sour cream in this recipe.

FUN FAMILY BIRTHDAY PARTY!  BIRTHDAY BOY IS AT THE HEAD OF THE TABLE

French Fridays With Dorie: Provencial Oilve Fougasse

HUBBY COMMENTED THAT THIS IS CONTAGIOUS--FUN AND FLAVORFUL
I should bake this Provencal Olive Fougasse again because now I know how I want it to turn out.

SOFT, STICKY DOUGH IS NOT MUCH THICKER THAN A BATTER
My fougasse was fun to make and delicious to eat, but it was not a beautiful rustic leaf.  My batter dough was obviously too soft even though I added an extra almost ½ cup of flour and maybe more if I count the rolling out flour addition.  My dough was to soft and sticky to roll out so I stretched it.  This was fine until I needed to move it to the baking sheets...way too soft.  It stretched to fit the entire pan.  Dorie wrote that “the dough will be very soft and sticky almost like a batter, and it will pool at the bottom of the bowl, but that’s fine.”

WHEN I LIFTED THE DOUGH TO MY PAN IT S-T-R-E-A-T-C-H-E-D

Well, my soft and sticky dough produced a fougasse that did not resemble Dorie's picture...my dough obviously needed another cup of flour to keep a shape.  I guess mine was TOO soft and sticky.
 
IT BAKED OK...BUT HAS AN EXTRA RUSTIC LOOK
Hubby and I both liked the flavor and texture of the olives; the other flavors were very subtle and overpowered by the olives and the salt.

Since most of us have acquired several lovely salts through our projects, I chose to use a Hawaiian white silver sea salt which glistened in the plentiful AZ sunlight.  This bread along with a simple salad were used as a relaxing on-the-patio snack.

Hubby, being from Pennsylvania and loving the PA Dutch foods, such as salty pretzels, loves to dip his salted breads in mustard like they do...so we followed suit, and also dipped this salted bread in mustard.

Even though I complain about my bread’s shapelessness, it was so tasty that I ate almost an entire baking sheet of this bread all by myself.  Hubby left for a bike ride so that he would stop eating.

Hubby was my only taster this time and besides liking this bread he also commented that they, meaning the French, like to put interesting items into their foods...I’m sure he meant olives in the bread.  I have used olives in breads in the past, but those breads have been more the artisan loaf style, making this was a different and interesting baking experience for me.  I think Dorie is right, this would be a fun picnic bread and with cheese it could make a meal.

HUBBY IS RIGHT, THIS FOUGASSE IS CONTAGIOUS
Hope your fougasse kept its leaf shape better than mine.  I’m interested to see how your baking projects fared.

HAPPY MOTHERS’ DAY to every woman out there who does mothering of any kind!!!!!!!!!!!!


Saturday, May 5, 2012

Baked Sunday Mornings: Malted Waffles

PERFCT MALT AND BUTTERMILK WAFFLES
Who doesn't love waffles, especially when they are light and airy on the inside and crispy on the outside?  This Baked recipe is perfect.

THICK BATTER IS EASY TO USE...NO DRIPS
Stephy-Wephy and Honey spent the night...a girls night of movies, eating and fun...their daddy was in CA for the weekend.  We needed a quick breakfast  because we decided it was a great morning to hit the mall and get all our shopping done.  

This waffle recipe met our needs as it took about 10 minutes from start to eating.  We made 8 large waffles on our iron...we each ate 2 or 3...they slid right down.

I'M TRYING TO DECIDE IF I WANT TO TRY ANOTHER NEW FOOD
I had wanted to make this a special waffle morning...until the mall idea.  We had planned to garnish our waffles with ice cream and fun toppings, but in our rush we used two kinds of homemade syrups that were already in the fridge:  blueberry and the caramel syrup made with buttermilk which is a family favorite.  If anyone had not made the caramely buttermilk syrup, you need to ask me for the recipe!  We make and eat it by the gallons.

I"LL GIVE THIS A TRY
FORGET THE FORK--THIS IS SERIOUSLY DELISH!

I wondered how this batter would taste with so much malt and also wondered if the buttermilk flavor would be overpowering.  Neither were...the total flavor was pleasing and just how a waffle should be.  I will definitely use this recipe again.

HERE'S MY STACK--NOTE HOW LIGHT AND AIRY THESE WAFFLES ARE

 OK...I'll get this done.  

Recipe for the buttermilk syrup. 

1 quart buttermilk
2 pounds butter
8 cups sugar
1/2 cup light corn syrup

Boil these ingredients together for 10 minutes in a huge pot.  It must be huge because when you add 4 teaspoons baking soda and continue to boil for an additional 2 minutes, this mixture will foam up and boil over and create a horrible mess.  I know, I've done it a couple of times...didn't learn the first time.

Then after removing from the heat, add 4 teaspoons vanilla extract, stir and the syrup is ready to use.

This is a great substitute for maple syrup.  It keeps in the fridge for a couple of months...just carefully reheat (microwave is good) and stir before using (the butter comes to the top when cold).

This syrup is the most requested syrup by my family and also by all my neighbors.  And, no problem to cut this recipe in half or just make a quarter of it.


Thursday, May 3, 2012

French Friday with Dorie: Almond Flounder Meuniere


HEALTHY FISH TACOS FOR CINCO DE MAYO
We love fish at our house, even though it is not always easy to find good fresh fish here in the desert.  We also love Mexican foods, and Saturday much of Arizona celebrates Cinco de Mayo.  In honor of Spanish feasts, which are family favorites, we’ve been eating Mexican foods all week.  It’s fun to visit the Mexican food markets where I find fresh, inexpensive produce and other items especially during this week.

Because we have an abundance of these fresh ingredients for our daily fiestas, today’s fish became one of those meals for us to enjoy.  And instead of parsley, cilantro is today's choice, and along with the lemon zest, lime juice is squeezed on this fish.

One side of the flounder is brushed with egg which is then coated in seasoned ground almonds.  This almond meal added a sweetness to the fish and is not overpowering in flavor, making it a great, healthy insert for warm tortillas.  I chose to not add anything else to my fish tacos as I wanted to taste the full flavor of this almond fish.  It is delicious and perfectly seasoned with lemon zest, salt and pepper, and cooked in browned butter.

I know this group is all about French cooking, but for this weekend, especially, I’ll also enjoy a Mexican influence.

I look forward to seeing all of your creations.


Tuesday, May 1, 2012

Tuesdays with Julia and Dorie: Hungarian Shortbread

INSTANT FAVORITE SHORTBREAD:  TERRIFIC RECIPE!
I’m taking a break in my day to post my Hungarian Shortbread Baking experience.  And such a lovely break this is.  Today is payday at the office and it is also an ingredient gathering day to help the “boy next door” who is getting married Saturday morning.  I’ve been asked to help with his reception food and fun.  Of course I’m loving this special honor.

When I drop off paychecks in about an hour, I plan to also take my baked shortbread to share with the office crew.  Paychecks in this bad economy rarely bring smiles; usually bring concern about how bills will all be paid on reduced income...but sweets always brighten moods and bring a short relief.

This recipe, for me, is all pantry items.  We can’t grow rhubarb in the Phoenix valley...too hot, and grocery store rhubarb is usually slimy and turning black, so frozen is usually the best way to go.  I keep a bag or two in my freezer as we love strawberry-rhubarb pie at our house.

 
BOTTOM LAYER IS OVEN READY
I made two recipe changes.  First, thinking about those pies we love,  I made rhubarb-strawberry jam for my middle layer.  Second, after reading through the P’s & Q’s I decided to bake the bottom shortbread layer for 15 minutes before adding the jam filling and the top layer.  (Note: this was a good idea!)

 
AFTER A 15 MINUTE PRE-BAKE

AFTER A GOOD FREEZE THE FOOD PROCESSOR IS A HANDY GRATER
Things I learned from this first baking: FREEZE the dough well before trying to grate.  After 45 minutes, my dough balls were only hard on the exterior, and the middle portion clogged the grater and made a mess, necessitating the need to re-freeze and a longer than planned for kitchen time.  After a much longer freeze time, my top layer grated beautifully and with none of the mess from the partially frozen first layer dough ball.  (Additional baking time for filled and with top layer: 30 minutes)

 
WITH JAM LAYER FILLING

WITH THIS GRATED TOP LAYER THE SHORTBREAD IS OVEN READY


OK...I’m now back home from my jaunt to the office.  I’m eating my 3rd piece as I continue to type up this post.  This Hungarian Shortbread recipe is fabulous! 

To entice my office tasters on this hot AZ day (I was worried there would be non-rhubarb eaters since this is not a usual AZ food) I brought along a tub of ice cream to top this treat.

 
BAKED

BAMMED WITH POWDERED SUGAR
SEE THAT DELICIOUS RHUBARB-STRAWBERRY FILLING?
WOW!  You all would have loved the comments.  The best came from Bill, who is an attorney renting an office from us, and he is a wanna-be chef (actually thinks he is the world’s best chef...always critiques my foods).  He said, “This shortcake is fabulous.  It is the BEST thing you’ve made yet.  Where did you get this recipe?”  I shared the process with him and he stated that the grating process must be why this “bread” is so light.  His only critique: leave out the strawberries; just go with the rhubarb.  Well, that is his opinion.  I have a tendency to do whatever is opposite of what Bill suggests, just something about disagreeing with someone who is always so “smart” and has the “final” word.  Know what I mean?  So just for Bill, I’ll keep in the strawberries next time, and I am now dreaming about other seasonal fruits for the filling: peaches, figs, blueberries.........

Anyway, this shortbread is an instant favorite.  Turned out perfect!
 
I’m looking forward to viewing and reading about what you have done...all 2 or 3 hundred of you.  Sounds like a fun week.

Happy May Day!